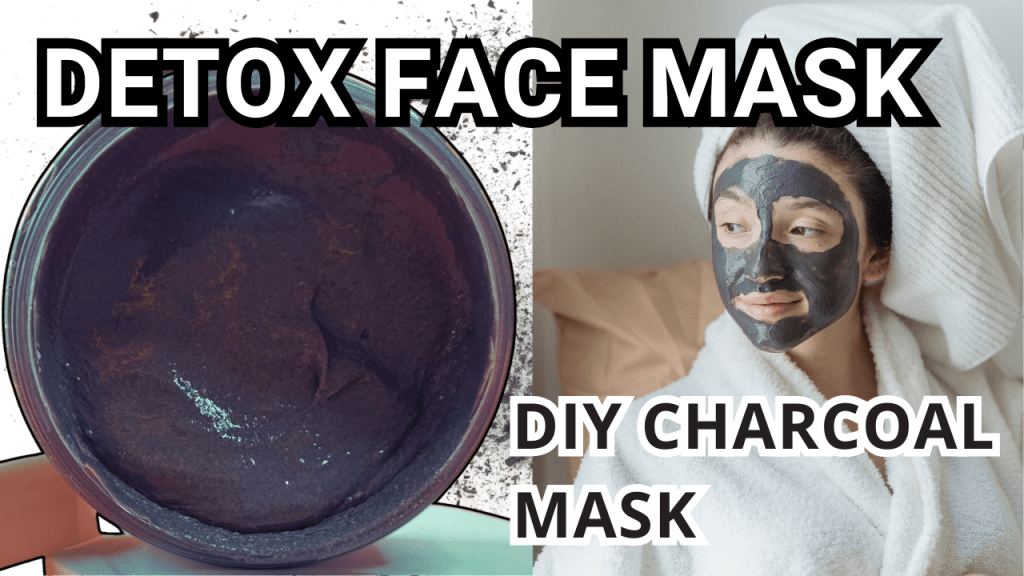
Creating your own skincare products can be incredibly rewarding—not only do you know exactly what’s in them, but you also get to customize them to your skin’s needs. In this post, I’ll guide you through a DIY charcoal face mask recipe that’s packed with skin-loving ingredients. This mask is designed to draw out impurities, balance oil levels, and leave your skin feeling soft, clean, and renewed. Let’s dive in and discover how you can make this luxurious charcoal mask at home!
Why Use a Charcoal Face Mask?
Charcoal face masks are ideal for anyone looking to deeply cleanse their skin. Activated charcoal has a porous structure, which makes it perfect for drawing out dirt, oil, and toxins from the skin. When paired with nourishing ingredients like grapeseed oil, vitamin E, and kaolin clay, it provides a well-rounded mask that detoxifies, nourishes, and hydrates, all in one application.
Ingredients You’ll Need & recipe
This mask has three main phases: the Oil Phase, the Water Phase, and the Cooldown Phase. Here’s a breakdown of each ingredient and why it’s beneficial:
Oil Phase
- 5g Caprylic – A lightweight emollient derived from coconut oil that adds moisture and leaves a smooth, soft finish without any greasiness.
- 5g Grapeseed Oil – Rich in antioxidants and fatty acids, this oil is non-comedogenic (meaning it won’t clog pores) and deeply nourishing.
- 4g Pola Wax – An emulsifier that helps the oil and water blend smoothly, giving the mask a creamy consistency.
- 1g Cetearyl Alcohol – A natural fatty alcohol that thickens and stabilizes the mask, adding a silky, luxurious texture.
Water Phase
- .5g Guar Gum – A natural thickener that gives the mask its smooth consistency.
- 6g Glycerin – A humectant that attracts moisture to the skin, helping to keep it hydrated.
- 4g Propanediol – A humectant.
- 62.5g Distilled Water – Pure water that acts as the base of the water phase, allowing the mask to stay lightweight and hydrating.
Cooldown Phase
- .5g Vitamin E – An antioxidant that protects the skin from environmental damage and helps to soften and condition.
- .5g Cedarwood Essential Oil – Known for its balancing and calming properties, cedarwood adds a grounding, earthy scent.
- 2g Leuicidal – A natural preservative to keep the mask fresh and safe.
- 2g Panthenol (Pro-vitamin B5) – Adds hydration, soothes the skin, and promotes a healthy skin barrier.
- 2g Natural Enzymes – Provide gentle exfoliation, helping to renew and brighten the skin’s surface.
- 1g Activated Charcoal Powder – The star ingredient for detoxification, known for its ability to draw out impurities.
- 4g Kaolin Clay – A gentle clay that absorbs excess oil without over-drying, leaving the skin smooth and balanced.
Step-by-Step Instructions
1. Begin with the Oil Phase
- Add the caprylic, grapeseed oil, Pola wax, and cetearyl alcohol into a beaker. Mix thoroughly until the ingredients are well combined. This phase creates the base of the mask, giving it a creamy, nourishing feel.
2. Prepare the Water Phase
- First, mix the guar gum with glycerin. Glycerin is a natural humectant, so it draws moisture to the skin, keeping it hydrated. Mixing it with guar gum prevents clumping and creates a smooth, thick consistency.
- Next, add this mixture to the distilled water and stir until everything is fully combined. Weigh the beaker and note the weight—this is important, as we’ll need to replace any water that may evaporate during heating.
3. Heat Both Phases
- Gently heat both the Oil and Water Phases in a double boiler until they’re around the same temperature. This helps the ingredients blend together smoothly.
- After heating, recheck the weight of the Water Phase. If any water has evaporated, add just enough distilled water to bring it back to its original weight. This step ensures your mask will have the correct texture and consistency.
4. Combine the Phases
- Now it’s time to combine! Pour the Water Phase into the Oil Phase while blending with an immersion blender. This creates a stable emulsion, making the mask creamy and smooth.
5. Let the Mask Cool
- Allow the mixture to cool down to room temperature. This cooling process is essential for adding the more sensitive, active ingredients in the Cooldown Phase.
6. Add the Cooldown Phase Ingredients
- Now that the base has cooled, it’s time to add the active ingredients in the Cooldown Phase:
- Vitamin E for antioxidant protection.
- Cedarwood essential oil for a calming, earthy scent and balancing properties.
- Leuicidal to act as a natural preservative.
- Panthenol for hydration and skin soothing.
- Natural enzymes to provide gentle exfoliation and help brighten the skin.
- Activated charcoal powder to detoxify and draw out impurities.
- Kaolin clay to balance oil production and provide a gentle, smooth texture.
- Blend everything together once more with the immersion blender. This final mix ensures a smooth, well-combined mask. Use a spatula to scrape down the sides and check the consistency.
7. Check the pH
- It’s important to check the pH of your mask to ensure it’s skin-safe. The ideal pH for a charcoal mask like this is between 4.5 and 5.5, which is close to your skin’s natural pH. If it’s too high, add a few drops of lactic acid to lower it. For this recipe, I adjusted the pH from 6.5 to 5.5 with a few drops of lactic acid.
8. Let the Mask Set Overnight
- Allow the mask to sit overnight. This gives the ingredients time to fully blend and settle, creating a stable, luxurious texture.
9. Packaging and Application
- After setting, your mask is ready to be packaged! Pour it into a 100ml jar, and it’s all set for your skincare routine.
To use, apply an even layer to clean skin, let it sit for 10-15 minutes, then rinse off with warm water. This mask will leave your skin feeling refreshed, deeply cleansed, and glowing.
Tips for Using Your Charcoal Face Mask
- Use 1-2 times per week for best results, especially if you have oily or combination skin.
- Patch test first if you have sensitive skin to make sure the mask is a good fit.
- Store in a cool, dry place and use within 1-2 months.
Final Thoughts
Making your own skincare products can be incredibly fulfilling, especially when you know they’re free from unnecessary additives. This charcoal mask is not only effective but also customizable to suit your skin’s needs. If you enjoyed this recipe, don’t forget to check out more DIY skincare recipes, and let me know in the comments how this mask worked for you!


Laisser un commentaire