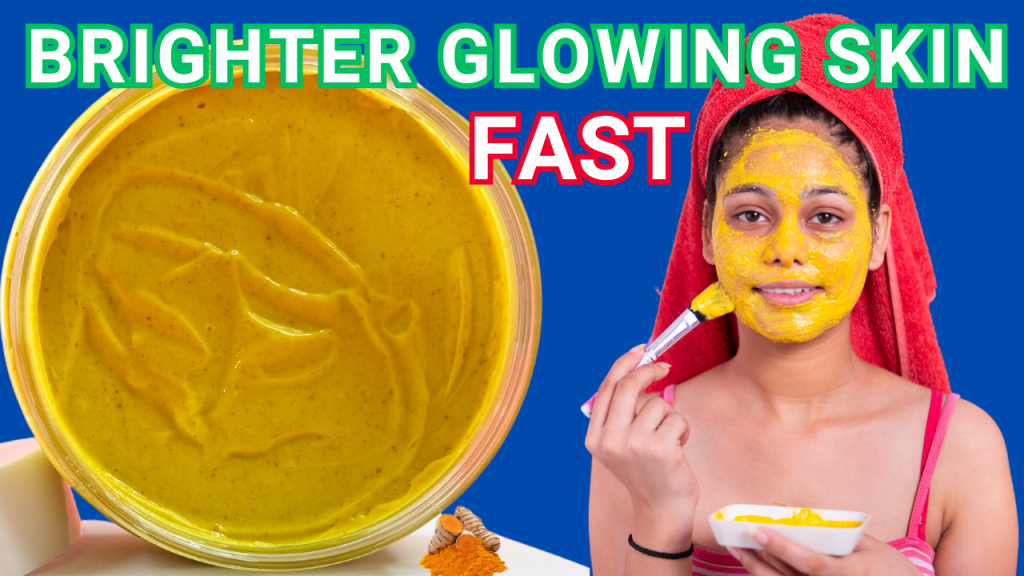
Welcome, DIY skincare enthusiasts! Today, I’m excited to share a complete guide to making a homemade turmeric face mask that will leave your skin brighter and glowing from the very first use. This easy recipe features powerful natural ingredients that are perfect for evening out your complexion, reducing inflammation, and bringing a healthy glow to your skin. Let’s dive in!
Ingredients You’ll Need
Oil Phase:
- Turmeric-Infused Oil: This oil is packed with antioxidants and anti-inflammatory properties to help brighten your skin.
- Orange Peel Infused Oil: Rich in vitamin C, this oil enhances the mask’s brightening effects.
- Olivem 1000: This is an emulsifier that helps blend the oil and water phases seamlessly. If you don’t have Olivem 1000, Emulsifier wax NF or POLAWAX can work as a substitute.
- Cetyl Alcohol: It adds a smooth, creamy texture to the mask. If you don’t have cetyl alcohol, you could use cetearyl alcohol as an alternative.
Water Phase:
- Orange/Turmeric Infusion: This is made by mixing orange powder and turmeric powder with distilled water, giving a natural vitamin C boost. If you don’t have the powders, you can simply use plain distilled water.
- Glycerin: A powerful humectant that keeps your skin hydrated. You can substitute glycerin with honey, aloe vera gel, or any other humectant of your choice for similar moisturizing benefits.
Cooldown Phase:
- Kaolin Clay: This gentle clay helps draw out impurities from your skin without over-drying. If you don’t have kaolin clay, bentonite clay is a good alternative, though it may be slightly more drying.
- Royal Jelly: This ingredient is full of nutrients that nourish your skin. If you don’t have royal jelly, honey can be a good substitute, offering similar moisturizing and nourishing benefits.
- Turmeric Powder: Provides extra brightening power. There’s no real substitute for turmeric powder.
- Niacinamide: Known for brightening and improving skin elasticity. If you don’t have niacinamide.
- Vitamin E: Acts as an antioxidant that helps protect your skin.
- Orange Essential Oil: This adds a refreshing scent and enhances the vitamin C content of the mask. Feel free to use whichever essential oil you prefer.
- Leucidal : This is essential to keep the mask fresh and prevent it from spoiling. You can use Geogard as alternative.
Recipe :
Water phase
- 69g Orange Powder Infusion
- 6g Glycerin
Oil phase
- 6g Turmeric Infusion Oil
- 2g Cetyl Alcohol
- 5g Olivem 1000
- 3g Orange Oil
CoolDown Phase
- 3g Kaolin Clay
- 1g Royal Jelly
- 1g Niacinamide
- 1g Turmeric Powder
- .5g Vitamin E
- .5g Orange Essential Oil
- 2g Leucidal
Step-by-Step Instructions:
1. Oil Phase
Start by preparing the Oil Phase. In a beaker, add the cetyl alcohol to give the mask a smooth and creamy texture. Then, add Olivem 1000, which acts as the emulsifier to allow the oil and water to mix perfectly. Pour in your turmeric-infused oil, packed with antioxidants to help brighten the skin. Finally, add the orange peel infused oil for that extra boost of vitamin C and a refreshing scent. Mix all the ingredients until they’re well combined, then set the Oil Phase aside.
2. Water Phase
For the Water Phase, start by making the orange and turmeric infusion. Pour distilled water into a beaker and add 2 teaspoons of the powder mix (orange and turmeric). This infusion is rich in vitamin C for brightening and turmeric for reducing inflammation. Mix well and then filter the mixture to remove any undissolved particles. Weigh out the exact amount needed for the Water Phase, then add glycerin. Glycerin will help draw moisture to your skin and keep it hydrated. Mix thoroughly.
3. Heating
Place both the Oil and Water Phases in a double boiler and heat gently. Heating both phases makes it easier for them to combine smoothly. Once warmed, remove both beakers from the heat.
4. Combining the Phases
Pour the Oil Phase into the Water Phase while blending with an immersion blender. This step is crucial to create a creamy, luxurious consistency that makes the mask easy to apply. Once blended, let the mixture cool to room temperature.
5. Cooldown Phase
Once cooled, it’s time for the Cooldown Phase. Add the royal jelly to nourish your skin, followed by niacinamide to help brighten and improve elasticity. Then, add turmeric powder for an extra boost of brightness. Kaolin clay helps draw out impurities, while a few drops of orange essential oil provide a refreshing scent. Add vitamin E to protect your skin, and finish by adding the preservative to keep the mask fresh and safe to use.
6. Final Blending and pH Check
Blend everything with an immersion blender, and use a spatula to ensure all the ingredients are fully incorporated. It’s important to check the pH of your mask to ensure it’s between 4.5 and 5.5, which is ideal for skin-friendliness and avoiding irritation.
7. Packaging
Let the mask set overnight, then carefully pour it into a 100ml plastic jar. Your turmeric face mask is ready to use!
Application Instructions:
Apply an even layer of the mask on clean skin and let it sit for 10-15 minutes. Then rinse off with lukewarm water to reveal brighter, glowing skin. You’ll love how smooth and refreshed your skin feels!
Tips and Tricks:
- Use the mask 1-2 times a week for best results.
- Always patch-test new products on a small area of skin to check for allergies.
Conclusion
I hope you enjoyed this step-by-step guide on making your own turmeric face mask! It’s an amazing way to naturally brighten your skin and give it the care it deserves. If you found this recipe helpful, be sure to share it with friends and leave a comment below about your experience. For more DIY skincare recipes, subscribe to my blog, and keep crafting your own skincare magic!


Laisser un commentaire